Pages

Monday, May 14, 2012

Lemon-Raspberry Trifle

I have always loved Trifle!
And for Mother's Day I received a..
Trifle Bowl!!
So of course I have to share with you my awesome Lemon-Raspberry Trifle Recipe!

Here is what you'll need:
1 cup Sugar
1/2 cup Water
Juice of 1 Lemon
3-4 cartons of Raspberries
1 med Jar of Raspberry Jelly
1-2 small Heavy Whipping Cream
1 Pound Cake

In sauce pan combine sugar, water & lemon juice over meduim heat.
*I also like to use the Zest of the lemon*
You will want to heat the liquid until the sugar has diszolved.
 BUT DO NOT BOIL!

While this is heating you can start slicing your pound cake.
Then once the sugar has disolved you can start spooning the liquid over the cake.
Be sure to coat it well!
And don't forget the backside.
I like to save a little extra liquid to add into the raspberry mix.
Next it's time to Whip the Cream!
My family likes lots of cream, so I always do 2 cartons.
Pour your cream into a bowl & mix on high!
If you have a stand up mixer PLEASE use it!
If not, then you might want to save the cream for last since you will be mixing it for a while.

Mix the cream until it starts to form thick peaks!
I like to leave my cream plain since it helps mellow out the overall sweet & tartness of the desert.
But you can always add sugar.

Next, you will want to clean and pat dry 2 cartons of raspberries(or more depending on the size of your bowl).
Then mix in the jam and lemon/sugar liquid.
Mash all together.
Then slice your cake slices into cubes.
Now comes the fun part!!
First place a layer of pound cake on the bottom.
Then add some berry mix!
Next add a layer of Whip Cream!
(I guess I forgot to take this picture. SORRY!)
Then repeat the process until you run out of room!
Be sure to end with a layer of whip cream
that way you can top with a layer of raspberries!
It should look like this when your done!
Another great idea is to...
I hope you enjoy!!

Oh, and don't be surprised if you see more trifle recipes in the future!
Now that I have a bowl I can't wait to make more trifles!!

Till Next Time,
Kate

Tuesday, May 1, 2012

Pintrest

Sooooooo I finally did it.
I joined Pintrest!!!
Yes I know that originally I didn't want to be addicted to my computer 24/7, but I must admit that Pintrest is fun!

I have been loving the fact that I can do a quick search for things!
Plus who doesn't love finding random ideas?
So be sure to Follow my Pintrest!!
Today while I was cleaning the kitchen, Jack started pointing at the stove saying
"Bank me Moma".
It took me a few minuets to realize that he was not saying "spank me"(which I originally thought since he was pointing at the jug that holds all our serving utensils and The Wooden Spoon) but he was saying "Bake me Moma".
As in "Please bake me something Mom".
So I decided to make:
And boy did they turn out GOOD!
I hope your having a great day!
Till Next Time,
Kate

Monday, April 16, 2012

I Will Joy: Giveaway!!!

My friend Mel over at I Will Joy is giving away a super cute pair of Earrings from her Etsy Shop

So be sure to head on over to her blog and Enter the Giveaway!!!
(Don't forget to tell her that I sent you!!)

Till Next Time,
Kate

I am Linking up With:

Friday, April 13, 2012

Baking Soda instead of Powder...

This week has been busy. 
Our car has been in the shop(again) for over a week now.
Normally this wouldn't be such a problem since we are kinda used to it now.
Except that our car seat got left in it :~(
Poor Jack-Jack has felt soo trapped lately!
We have been having fun outside taking walks and playing whenever it's nice out. 
But the poor kid is ready to have a day out and about!

Also this past week while grocery shopping I manged to find a great deal on Zucchini!
So today I decided why not try my hand at baking some bread?
Everything was going great until I realized that I had put baking Soda in instead of baking Powder!
I don't think it raised quite like it was supposed to.
But it still tastes pretty good!
Plus my kid LOVES it!!
I hope your having a great day!

Till Next Time,
Kate


Monday, April 9, 2012

Homemade Pretzels

My family LOVES homemade pretzels!
And theses pretzels are sooo easy to make!

Here is what you'll need:
1 package active dry yeast
2 tablespoons brown sugar
1 teaspoon salt
1 1/2 cups warm water
3 1/2 cups flour
2 cups warm water
2 tablespoons baking soda
butter
kosher salt

In a large bowl dissolve yeast, brown sugar, salt & 1 1/2 cups water. 
Be sure to wait about 5-15mins for the yeast to activate. 
You will know it's ready when it starts to bubble like this:
Next, stir in flour
 and knead on a floured surface until dough is smooth and elastic.
Roughly 8mins.
Then cover and let rise in a greased bowl for 1 hour 
or until it doubles in size.
Now combine 2 cups warm water and baking soda in a pan. 
Cut dough into pieces and roll into a pencil thin rope.
 (we like ours thicker)
Then twist your rope into a pretzel shape and dip shape into the baking soda solution. 
Then place onto parchment covered baking sheet and let rise 15-20mins while your oven preheats to 450.
I personally love to use my Pampered Chief cookie sheet since I don't even have to grease it!
Then bake your pretzels for 8-10mins, or until golden brown. 
You can either melt a couple of tablespoons of butter and brush it over the tops of the pretzels. 
Or like me, just use the stick!
Then sprinkle with kosher salt.
And enjoy!

My family also loves Cinnamon Sugar Pretzels!
So of course I want to show you how easy they are to make! 

In a plastic bag mix together:

1 tablespoon brown sugar(we love brown sugar so I do 2 tablespoons)
3 tablespoons sugar
1-2 tablespoon Cinnamon
**These measurements are guesstimated since I just eyeball it**

Next you will baked and brush your pretzels in butter.
Don't forget to brush the bottoms.
Then place the pretzel in the bag 
and shake! 

I really hope that you enjoy these pretzels!
My dad LOVES them!


Till Next Time,
Kate


Wednesday, March 28, 2012

Hey Strangers!

Things have been pretty busy for us!
For those of you who didn't know, last month we had trouble with our car...Again.
But don't worry, we got it back on Monday! 
YAY!!
Now we are slowly getting back to normal. 
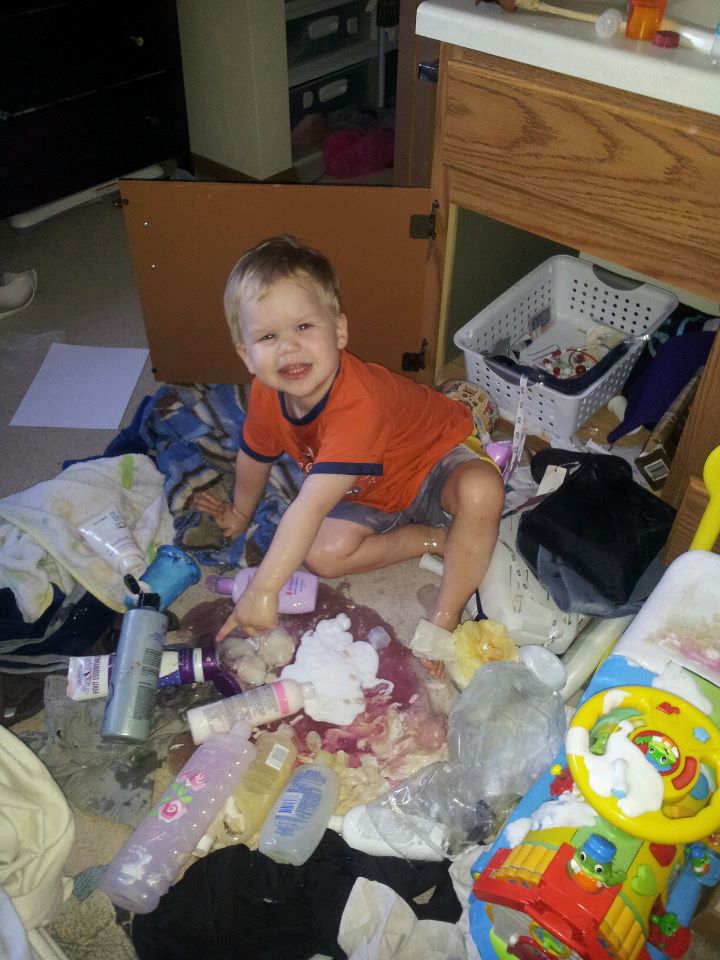
Well we were trying...Here's what Jack did last night!
After Jack woke up from his nap he politely asked to watch a movie on our bed.
I didn't think anything of it since it's always been a special treat for him. 
And he's pretty much always behaved. 
But this time he had fun emptying out the vanity in our room.
I was not a happy mom.
But at least he got to enjoy a bubble bath!

My silly boy has also been enjoying all the rain we've been getting since it means he can go outside and look for worms!!
But now that the sun is coming out I'm hoping that he can spend more time outside!
I hope you're enjoying the spring weather too!

Be sure to head over to my Mom's new blog Kim's Path!!!
She has some really awesome photos up from her recent trip to New Zealand!

Till Next Time,
Kate

Thursday, March 15, 2012

Cinnamon-Swirl Bread

If you know my son then you know that Cinnamon-Swirl Bread is right up his alley!
My kid LOVES any kind of banana or zucchini bread. 
So i figured why not try some Cinnamon-Swirl bread!! 
So here's what you'll need:

4 12-5 cups flour
1 package active dry yeast
1 1/3 cups milk
3 tablespoons sugar
3 tablespoons butter
1/2 teaspoons salt
2 eggs

In a large bowl stir together 2 cups flour and yeast.
In a saucepan heat the milk, sugar, and salt until warm. 
Then add the liquid to the flour mixture along with the eggs. 
Beat on low to medium speed for 30 seconds.
Be sure to scrape the sides of the bowl!
Then beat on high for 3 minuets.
Next add as much of the remaining flour as you can(about 2 cups).
Then turn dough onto a well flour surface and knead for 6-8mins
until you have a stiff dough that is smooth and elastic.
Then place dough in a warm place to rise until double in size.
About 45-60mins.

Here is what you will need for the Cinnamon Filling:

1/2 cup sugar
1/4 cup packed brown sugar
2 tablespoons cinnamon

Mix together in a bowl, then set aside.
Once your dough has risen,
punch down the center and cut in half.
Then roll each half into a 12x7inch rectangle
and spread with butter then filling.
I actually brushed water instead of butter and it did not turn out the same. So be sure to use butter!
Then roll each rectangle into a log
pinch the seams, and place into greased loaf pans.
Let rise until doubled.
Then bake for 20-25mins in a preheated 375* oven. 
I like to melt butter over the top. 
Be sure to let the bread cool
before you enjoy a piece!

Till Next Time,
Kate